
Today, we are happy to announce preliminary support for the R language in H2O Wave. We now ship an R package that allows you build and control dashboards in Wave, and has feature-parity with Python Wave Scripts.
Introduction
The R language driver allows you to author R programs that can publish and control live web content using the Wave server. The entire suite of cards, components and page layout controls previously only available via Python are now accessible via R.
H2O Wave supports two kinds of programs:
- Wave apps are interactive programs that can update content and respond to user actions.
- Wave scripts are simpler, non-interactive (batch) programs: they can update content, but not respond to user actions.
The current release of the R language driver only supports Wave scripts. Support for Wave apps will ship in the near future.
To learn more about H2O Wave and what it can do for you, explore our documentation.
Installation
- Install the prerequisites:
> install.packages(c("R6","devtools","jsonlite","stringr","httr"))
There are two ways to install
h2owave
From command line:
$ R CMD INSTALL h2owave_0.0.14.tar.gz
From R interactive environment:
> install.packages(“h2owave_0.0.14.tar.gz",repos=NULL,type="source")
Hello World Example
To be able to use the h2owave library it must first be loaded to the R environment.
Once the library is loaded we follow that up by creating a page object.
library(h2owave)
page <- Site("/demo")
Once the page object is created we add a card on to the page.
page$add_card("hello",ui_markdown_card(box="1 1 2 2",
                    title="Hello World!"
                    ,content='And now for something completely different!'
                    ))
Finally, we save the page.
page$save()
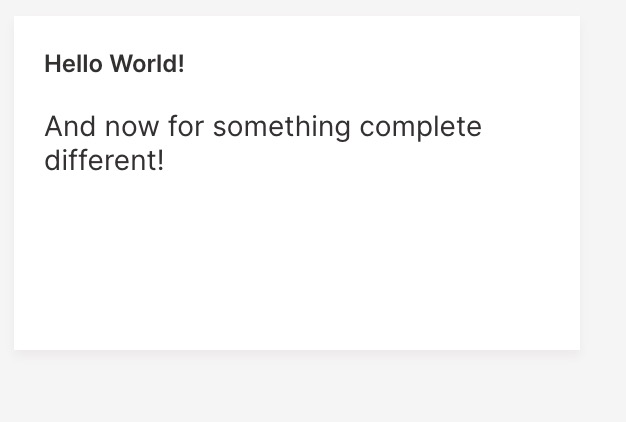
Here is the entire code for the Hello World example.
library(h2owave)

page <- Site("/demo")

page$add_card("hello",ui_markdown_card(box="1 1 2 2",
                    title="Hello World!"
                    ,content='And now for something completely different!'
                    ))

page$save()
Here is the output.
Design and API Overview
Firstly, lets go over the hiearchy of the basic components.
[Site] -> [Page] -> [card]
A Site can contain multiple Pages. Each Page can have multiple cards. Each Page is uniquely identified by a route on a Site.
library(h2owave)

page <- Site("/demo")

page$add_card("hello",ui_markdown_card(box="1 1 2 2",
                    title="Hello World!"
                    ,content='And now for something completely different!'
                    ))

page$save()
Site
The Site() function takes in a route string and returns a Page object. In the above example /demo is the route on Site that points to the Page object - page.
page <- Site("/demo")
Page
A Page object has four methods:
page$add_card(): Adds a card to the page.The
add_card()method takes in two parameters as follows:add_card(card_name,*_card(...)). In the above example,card_nameis"hello"and*_card()function isui_markdown_card().page$set(): Modify a variable on a card (already on a page).The
set()method takes in variable number of parameters -set("card_name","parameter_name","new_parameter_value"). The first parameter is thecard_namefollowed by theparameter_namewhich needs to be modified. And finally thenew_parameter_value.When modifying an element in a parameter that is a list, the first parameter is the
card_name, followed by theparameter_list_name,element_name, and thenew_element_value-set("card_name","parameter_list_name","element_name","new_element_value"). If the element is nested within multiple nested parameter lists then all the parameter list names preceed theelement_name.page$save(): Thesave()method does not take in any variable. It saves or updates a page and pushes the changes to thewaveserver.page$drop(): Similar to thesave(), thedrop()method does not take any parameter. It plainly removes a page from theSite.
Card
The *_card() function takes in variable number of parameters. The number of parameters are dependent on the type of *_card().
ui_markdown_card(box="1 1 2 2"
                ,title="Hello World!"
                ,content='And now for something completely different!'
                ))
The above example ui_markdown_card() accepts three parameters.
box: The box defines the position and the size of the card. The four integers represent: starting column and row number, and the number of columns and rows occupied by the card.title: The title of the markdown card.content: The message of the markdown card.
Note: While going through the above Hello World example you would have noticed that we created a
Page object - page. This is because we have used the R6 library to create objects and their respective
methods. The ability to create these objects and methods helps manage each instance of a Page object.
Advanced Example
Initial Card Setup
Let's take an advanced example and introduce a few more variables within the *_card() function. In this example, we will also dynamically update a few variables in the card. The card that we will use here is the ui_wide_bar_stat_card().
First, we load the library and create a Page object.
library(h2owave)

page <- Site("/demo")
Following the creation of the Page object, we add the card ui_wide_bar_stat to the page.
crypto_price <- runif(1,1,500)
crypto_price_change <- runif(1,0,1)
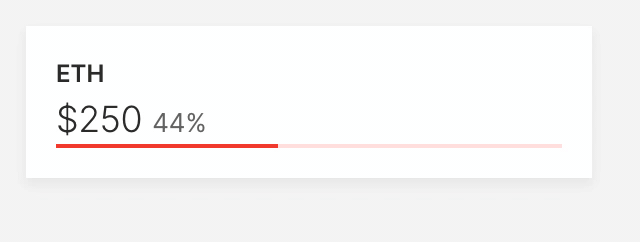
page$add_card("wide_bar",ui_wide_bar_stat_card(box="1 1 2 1"
,title="ETH"
,value='=${{intl price minimum_fraction_digits=2 maximum_fraction_digits=2}}'
,aux_value='={{intl change style="percent" minimum_fraction_digits=2 maximum_fraction_digits=2}}'
,plot_color='$red'
,data=list(price=crypto_price,change=crypto_price_change)
,progress = crypto_price_change
))
Here,
- The card is named
"wide_bar". - The card function is
ui_wide_bar_stat_card(). The following are the parameters of the*_card()function:box: Defines the position and the size of the card. The four integers represent: starting column and row number, and the number of columns and rows occupied by the card. In this example, the card starts from the 1st column and 1st row, and spans 2 columns and 1 row.title: The main title that appears on the card, here it is "ETH".value: Displays the primary value on the card. The value is of type numeric, and holds a maximum and minimum of 2 decimal places. The variable that will populatevalueisprice. This value is fed through the parameterdatawhich is a list.aux_value: Displays the secondary value on the card. The value is also of type numeric, and holds a maximum and minimum of 2 decimal places. The name of theaux_valueon the card ischange. This value is fed through the parameterdatawhich is a list.plot_color: This is a parameter that takes in the name of a color. In this case it is$reddata: Specifies a list of parameters that populatevalueandaux_value. Herepriceis fed bycrypto_price, andchangeis fed bycrypto_price_changevariables, respectively.progress: This card paramter displays a visual that show progress. In this example, the variablecrypto_price_change(between 0 - 1) populatesprogress.
Once the card is populated with all the parameters, the page is saved and sent to the wave server.
page$save()
Here is the entire code for setting up the card.
library(h2owave)

page <- Site("/demo")
crypto_price <- runif(1,1,500)
crypto_price_change <- runif(1,0,1)

page$add_card("wide_bar",ui_wide_bar_stat_card(box="1 1 2 1"
              ,title="ETH"
              ,value='=${{intl price minimum_fraction_digits=2 maximum_fraction_digits=2}}'
              ,aux_value='={{intl change style="percent" minimum_fraction_digits=2 maximum_fraction_digits=2}}'
              ,plot_color='$red'
              ,data=list(price=crypto_price,change=crypto_price_change)
              ,progress = crypto_price_change
))
page$save()
Dynamically Updating the Card
Once the ui_wide_bar_stat_card is setup we now add code to the same example which will dynamically update few parameters.
In the example, we will update three parameters:
price: This is a parameter in thedatalist, and is fed bycrypto_price.change: This is the second parameter in thedatalist, and is fed bycrypto_price_change.progress: Provided by the variablecrypto_price_change.
while(TRUE){
  Sys.sleep(3)
  crypto_price <- runif(1,1,500)
  crypto_price_change <- runif(1,0,1)
We simulate the dynamic behaviour by placing the entire dynamic-card-update code in a while(TRUE) loop, with a interval of 3 seconds, Sys.sleep(3).
Following the while loop, we set a value for crypto_price and crypto_price_change.
  page$set("wide_bar","data","price",crypto_price)
  page$set("wide_bar","data","change",crypto_price_change)
  page$set("wide_bar","progress",crypto_price_change)
  page$save()
}
Next, we use the page$set() method to dynamically update the values. The order of parameters that go into set() is, "card_name","parameter_name", or "parameter_list_name" and "element_name", and finally, the new_parameter_value or element_value.
In the example, the below two set-values are elements in the parameter data.
  page$set("wide_bar","data","price",crypto_price)
  page$set("wide_bar","data","change",crypto_price_change)
Here, page$set("wide_bar","progress",crypto_price_change) sets the parameter progress. And is followed by saving/updating the page.
Here is the entire code for dynamically updating the card.
library(h2owave)

page <- Site("/demo")
crypto_price <- runif(1,1,500)
crypto_price_change <- runif(1,0,1)

page$add_card("wide_bar",ui_wide_bar_stat_card(box="1 1 2 1"
              ,title="ETH"
              ,value='=${{intl price minimum_fraction_digits=2 maximum_fraction_digits=2}}'
              ,aux_value='={{intl change style="percent" minimum_fraction_digits=2 maximum_fraction_digits=2}}'
              ,plot_color='$red'
              ,data=list(price=crypto_price,change=crypto_price_change)
              ,progress = crypto_price_change
))
page$save()

while(TRUE){
  Sys.sleep(3)
  crypto_price <- runif(1,1,500)
  crypto_price_change <- runif(1,0,1)
  page$set("wide_bar","data","price",crypto_price)
  page$set("wide_bar","data","change",crypto_price_change)
  page$set("wide_bar","progress",crypto_price_change)
  page$save()
}
Here is the output
Conclusion
The above examples illustrate the possibility of building dynamic dashboards using the h2owave R library. In a future release we will be adding the ability to build interactive web applications.
In the R h2owave library we have tried to keep programming easy, simple, and idiomatic, we understand that there is always room for improvement and would love to hear from you in case you have comments, and suggestions. Link
We look forward to continuing our collaboration with the community. Follow updates to Wave on Github: https://github.com/h2oai/wave